So, we know that running Windows 10 on Amazon Elastic Comoute is something that a lot of people have been wanting, for quite some time now. So why does Amazon not provide a Windows 10 AMI? My guess is licensing, but I have no idea! For now, if you want an Amazon Machine Image (AMI) running Windows, you either need to use a server OS, or roll your own. We are going to create our own AWS AMI Running Windows 10.
There are a few things you are going to need.
- WIndows 10 ISO of course
- Hypervisor of some sort. I prefer Virtual Box for this as it is free, and I am cheap.
- Access to the AWS CLI
To get started, install Windows in Virtual box the same way you would with any OS. Once the install has completed, install all of the Windows Updates (remember, this is going to be a golden image, or AMI), so the less patching you have to do when deploying as an EC2 instance, the better.
We need to ensure that the local account you created on your Windows install has a username AND a password, otherwise you will not be able to leverage the Remote Desktop Protocol (RDP) to access the VM. Once this has been completed, shut down the VM.
Now we need to move to AWS (specifically S3), where we have to create a bucket that will store our image file. Once you have the bucket created, move the newly created VHD file that you made earlier to S3. You can do it via the GUI (not recomended), or using the AWS CLI. Here are the commands to move the VHD file.
aws s3 cp windows10.vhd s3://mybucketnamehere --region ca-central-1
Obviously change the name of the VHD, the bucketname and the region that you created the S3 bucket in.
The VHD is quite large, so this will take some time to transfer depending on the speed of your Internet Connection.
Once the upload has completed, we need to leverage the AWS import-image functionality. This tool reads instructions from a .json file which we will create. Fire up notepad.exe and enter the following.
[{
“Description”: “Windows 10 Base Install”,
“Format”: “vhd”,
“UserBucket”: {
“S3Bucket”: “yourbuckethere”,
“S3Key”: “Win10.vhd”
}
}]
Save the file as containers.json. Obviously with the above snippet, you will need to edit the fields to match your environment. Once done save it. Now we need to kick off the import task which is done on the AWS CLI.
aws ec2 import-image --description “Windows 10” --disk-containers file://containers.json
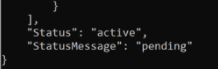
This starts the import job. If you want to check on the status (as it will take 30-40 minutes), issue the following command from the AWS CLI.
aws ec2 describe-import-image-tasks
You will see the below pending message for a minute or two after you submit your job.
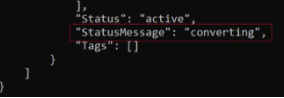
Then the VHD file begins the process of converting to an AMI, this takes a good chunk of time, so be patient.
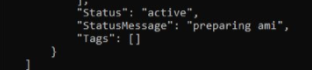
Now, we move onto preparing AMI
And then we are done.
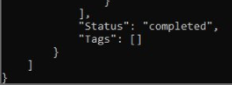
You should now be able to see your Windows 10 image as a custom AMI in the EC2 console.